- Description
- Warranty Information
- Hardware Specifications
- How to Install Desktop RAM?
- How to Check Desktop RAM?
- FAQs
Refurbished 8GB Desktop Memory RAM DDR3 PC3-12800 1600MHz 240-pin DIMM
Enhance your desktop's performance with our 8GB refurbished desktop memory RAM, 1600Mhz DDR3 Non-ECC Unbuffered DIMM, and 240 Pin 1.35V. Engineered for seamless compatibility and maximum efficiency, this module operates at 1600MHz, ensuring smooth multitasking, faster data transfers, and enhanced overall system responsiveness.
Refurbished to meet high standards of quality and reliability, this module is non-ECC unbuffered, ensuring stability and reliability during demanding tasks. With a 240-pin form factor and low-voltage operation at 1.35V, it seamlessly integrates into your desktop's existing setup without compromising performance.
Upgrade your desktop today and enjoy improved speed and responsiveness for tasks such as gaming, multimedia editing, or everyday computing. With easy installation and reliable performance, our refurbished DDR3 desktop memory RAM module is your solution for an optimised computing experience.
Compatible Devices:
Acer Server Other Models AP130 F2, Acer Veriton P Series P130 F3, Acer Altos Other Models T110 F3 Series (AT110 F3), Acer Altos Other Models T310 F3, Acer Altos Other Models T110 F2 Series (AT110 F2), Acer Altos Other Models C100 F3 Series, Acer Server Other Models AC100S, Acer Server Other Models AT110 F3
Asus Motherboard Z7 / Z8 / Z9 / Z10 Series Z9PA-D8, Asus Motherboard P8 Series P8B-MX, Asus Server TS Series TS700-E6/RS8, Asus Server ESC Series ESC1000 G2, Asus Server ESC Series ESC700 G2, Asus Server RS Series RS100-E7/PI2, Asus Server TS Series TS100-E7/PI4, Asus Motherboard P9 Series P9D-E/4L, Asus Motherboard P9 Series P9D-I, Asus Motherboard P9 Series P9D-MH/SAS/10G-DUAL, Asus Server TS Series TS100-E8-PI4, Asus Server TS Series TS300-E8-PS4, Asus Server RS Series RS320Q-E7/RS12, Asus Server RS Series RS100-X7, Asus Server RS Series RS100-E8-PI2, Asus Server RS Series RS300-E8-PS4, Asus Server RS Series RS300-E8-RS4, Asus Motherboard P9 Series P9D-C/4L, Asus Motherboard P9 Series P9D-C/2L, Asus Motherboard P9 Series P9D-M, Asus Motherboard P9 Series P9D-MX, Asus Motherboard P9 Series P9D-MV, Asus Motherboard P9 Series P9D-X, Asus Server RS Series RS300-E7/RS4, Asus Server RS Series RS300-H8-PS12, Asus Motherboard P9 Series P9D-V, Asus Server TS Series TS300-E8-RS4-C, Asus Server Other Models S1016P, Asus Server TS Series TS110-E8-PI4, Asus Motherboard P9 Series P9A-I/C2550/4L, Asus Motherboard P9 Series P9D-MH/10G-DUAL
Dell PowerEdge T Series T110 II, Dell PowerEdge M Series M420, Dell PowerEdge T Series T20, Dell PowerVault NX Series NX3300, Dell PowerEdge R Series R220

Fujitsu Siemens Primergy RX Series RX100 S7p (D3032), Fujitsu Siemens Primergy TX Series TX100 S3p (D3009), Fujitsu Siemens Motherboard D Series D3128-B, Fujitsu Siemens Primergy RX Series RX100 S8 (D3229), Fujitsu Siemens Celsius R930, Fujitsu Siemens Primergy TX Series TX1310 M1 Essential Edition, Fujitsu Siemens Primergy RX Series RX1330 M1, Fujitsu Siemens Primergy TX Series TX1310 M1 LFF, Fujitsu Siemens Primergy TX Series TX1310, Fujitsu Siemens Primergy TX Series TX1330 M1 Rack, Fujitsu Siemens Primergy TX Series TX1330 M1 Tower, Fujitsu Siemens Primergy TX Series TX1320 M1, Fujitsu Siemens Primergy TX Series TX120 S3p (D3049), Fujitsu Siemens Primergy TX Series TX140 S2 (D3239), Fujitsu Siemens Primergy TX Series TX140 S1p, Fujitsu Siemens Simatic IPC847D
HP ProLiant MicroServer MicroServer Gen8 Series, HP Workstation Z Series Z420, HP Workstation Z Series Z620, HP ProLiant ML Series ML310e Gen8, HP ProLiant ML Series ML320e Gen8, HP ProLiant DL Series DL320e Gen8, HP ProLiant XL / Apollo Series XL220a Gen8 v2, HP ProLiant ML Series ML10, HP StoreEasy 1430, HP StoreEasy 1440, HP ProLiant ML Series ML10 v2, HP ProLiant ML Series ML310e Gen8 v2, HP ProLiant MicroServer MicroServer Gen8 G1610T, HP ProLiant MicroServer MicroServer Gen8 G2020T, HP Workstation Z Series Z1 G2 (All-in-One) AIO, HP ProLiant WS Series WS460c Gen8, HP ProLiant DL Series DL320e Gen8 v2, HP StoreEasy 1540, HP StoreEasy 1530
Lenovo ThinkServer RD Series RD430, Lenovo ThinkServer RD Series RD330, Lenovo ThinkStation C Series C30, Lenovo ThinkServer TS Series TS140, Lenovo ThinkServer TS Series TS440, Lenovo ThinkServer RS Series RS140, Lenovo ThinkStation S Series S30 4352, Lenovo Storage Area Network EMC PX12-450R
-

- Bandwidth:
- 12800 MB/s
-

- Bus Speed:
- PC3-12800 (DDR3-1600)
-

- Capacity:
- 8GB (1 x 8GB)
-

- CAS:
- CL11
-

- Compatibility:
- DDR3 Motherboards, Desktops
-

- Data Integrity:
- Non-ECC Unbuffered
-

- Memory Type:
- DDR3 SDRAM
-

- Manufacturer:
- Various
-

- Rank:
- 1R, 2R
-

- Voltage:
- 1.5V
-

- Condition:
- Refurbished
-

- Clock Speed:
- 1600Mhz
-

- Form Factor:
- DIMM (Dual In-Line Memory Module)
-

- Number of Pins:
- 288 Pin
Memory RAM Installation Guide for Desktop Computer
Step 1
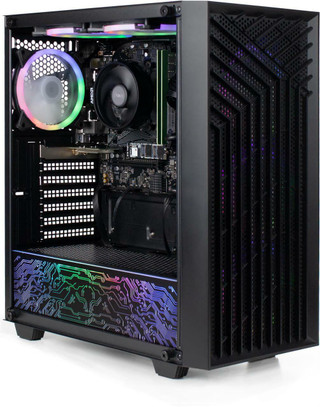
Equipment required:
- Memory RAM modules
- Screwdriver (non-magnetic-tip)
- Owner’s manual
Step 2
-
Shut Down Your Computer:
Make sure to properly shut down your computer through the operating system.
-
Unplug the Power Cable:
Remove any cables connected to the computer, including the power cable.
-
Hold the Power Button:
Press and hold the power button for 5 seconds to discharge any residual electricity.
-
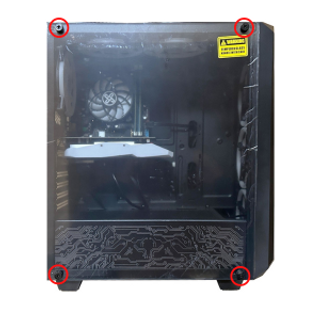
Open the Case:
Consult the owner’s manual for instructions on how to open your specific system’s case.
Step 3
-
Ground Yourself:
Touch an unpainted metal surface to discharge static electricity. Better yet, wear an anti-static wrist strap attached to a grounded object.
-
Locate the RAM Slots:
Open the case and locate the RAM slots on the motherboard.
-
- Remove Existing RAM (if applicable):
- Press down on the clips at the ends of the RAM slot.
- Gently remove the existing RAM module by holding the edges.
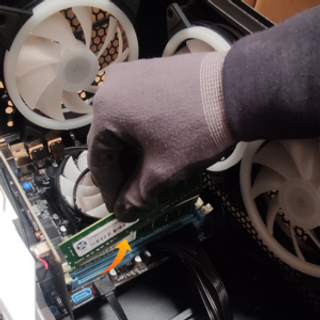
Step 4
-
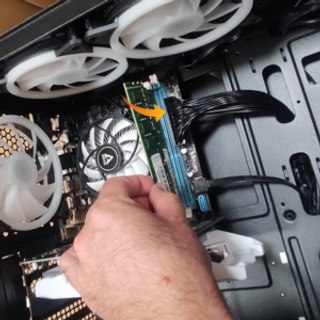
Install New RAM:
- Hold the new RAM module by the edges.
- Align the notch on the module with the key in the slot.
- Firmly press the RAM into the slot until the clips snap into place. It may require about 30 pounds of pressure.
- Close the Case: Once all the RAM modules are securely installed, close the computer case.
- Reconnect Cables: Plug in the power cable and any other cables you disconnected.
-
Power On and Test:
Turn on your computer. It’s recommended to enter the BIOS to ensure the new RAM is recognized and running at the correct speed.
Post-Installation
- Check System Properties: Once your computer has booted into the operating system, check the system properties to confirm that the new RAM is detected and usable.
- Enjoy Your Upgraded Computer: You should now notice improved performance, especially when running memory-intensive applications.
Remember to handle the RAM modules carefully and avoid touching the gold connectors. Always work in a clean, static-free environment, and if you’re unsure about the process, seek professional assistance. Happy upgrading!
Happy upgrading!
How to Check Memory RAM in Your Desktop PC:
Make sure you are using a desktop computer because the RAM installation instructions are designed specifically for desktop computers.
Step 1: Identify Installed Memory
Press the Windows key + R to open the Run dialogue box.
Type "msinfo32" and press Enter. This opens the System Information window.
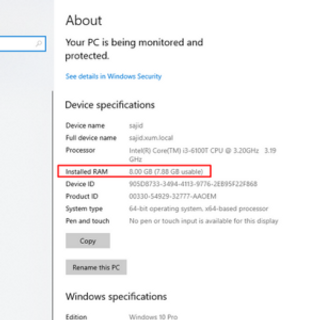
In the left pane, navigate to "System Summary". On the right side, you'll see details about your installed memory, including the total installed physical memory (RAM).
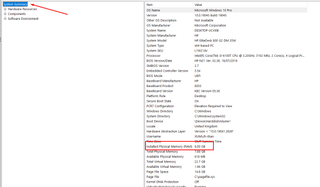
Using Command Prompt to Convert Memory Size to GB
Open Command Prompt by pressing the Windows key + R and typing "cmd" into the search bar.
Open Command Prompt by pressing the Windows key + R and typing "cmd" into the search bar. type the following command: "wmic memorychip get capacity" In the Command Prompt window, then Press Enter. This command will display the capacity of each memory module in kilobytes (KB).
- To convert KB to GB, divide the capacity by 1,048,576 (1024 * 1024).
- For example, if the capacity is displayed as 4294967296 KB, the calculation would be:
- 4294967296 KB / 1048576 = 4096 GB
- 4194304 KB / 1048576 = 4 GB
- Repeat this calculation for each memory module listed to determine the total memory size in GB.
Step 2: Maximum RAM Capacity
The maximum amount of RAM your computer can support is as follows:
- Press Windows Key + R, type cmd, and press Enter.
- In the command prompt, type wmic memphysical get maxcapacity, and press Enter.
- The result will be displayed in Kilobytes. Convert this to Gigabytes by dividing by (1024) twice. For example:
To calculate the maximum RAM capacity for a computer that supports up to 8GB:
- 10248388608KB=8192MB
- 10248192MB=8GB
- Thus, the maximum memory capacity is approximately 8 GB.
Step 3: RAM Slot Information Through Command Prompt.
- Press the Windows Key + R to open the Run dialog box.
- Type "cmd" and press Enter to launch Command Prompt.
- In the Command Prompt window, type: wmic Memphysical get MemoryDevices Then, press Enter.
- The number displayed represents the total number of RAM slots on your computer. For Example, if it shows '2', your computer has two slots.
To determine the maximum capacity per slot, divide the total maximum RAM by the number of slots. For example, if your system has a maximum capacity of 8 GB and 2 slots, each slot supports up to 4 GB.
Step 4: Slot Information Through Task Manager
Press Ctrl + Shift + Esc together to directly open the Task Manager.
Alternatively, press Ctrl + Alt + Delete, then select "Task Manager" from the options menu that appears.
Another alternative is to right-click on the taskbar and select "Task Manager" from the context menu.
Click on the "Performance" tab in the Task Manager window. In the left pane, click on "Memory". This will display information about your system's memory usage.
Look for the "Slots used" field under the "Memory" section. This indicates the number of memory slots currently in use.
Step 5: To identify the required generation of RAM:
- Open Task Manager with Ctrl + Shift + Esc or by right-clicking the Start button.
- Navigate to the ‘Performance’ tab to find the RAM generation (e.g. DDR3, DDR4). RAM generations are not interchangeable.
Step 6: Check Memory Speed
- In the same Memory section of the System Information window, look for the "Speed" field.
- The speed will be listed in megahertz (MHz) and indicates the frequency at which the memory operates.
Step 7: System Memory Support
Determine your system's architecture using either of the following methods:
Option 1: Using Command Prompt
- Press the Windows Key + R to open the Run dialog box.
- Type "cmd" in the command prompt window and then press Enter.
- In the Command Prompt window, type: wmic os get OSArchitecture Then, press Enter. This command will display whether your system is running a 32-bit or 64-bit version of Windows.
Option 2: Check System Memory Support.
- Press the Windows Key + R to open the Run dialog box.
- Type "msinfo30" in the Run dialog box to open the system information, then Press Enter.
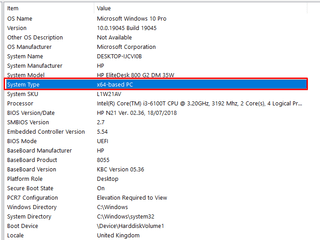
- In the System Information window, look for the "System Type" under the "System Summary" section. This command will display whether your system is running a 32-bit or 64-bit version of Windows.
Based on your system's architecture, understand the following limitations:
- For 32-bit Windows: The maximum amount of RAM supported is typically around 4 GB, although this can vary depending on the specific version of Windows and any limitations imposed by hardware or software.
- For 64-bit Windows: The maximum amount of RAM supported varies depending on the specific edition of Windows. For example, Windows 10 Home supports a maximum of 128 GB of RAM, while Windows 10 Pro and Enterprise support up to 2 TB of RAM.
FAQs for Desktop Memory RAM
RAM allows your PC to access data quickly, improving performance for tasks like loading applications and multitasking.
Choosing the right RAM for your desktop PC involves considering the type (DDR3, DDR4), capacity, speed, and compatibility with your motherboard. To ensure you select compatible RAM, we’ve provided a detailed guide through the ‘How to check Desktop RAM’ tab on our Product page. This guide will help you check your current RAM specifications and understand the requirements for upgrading or adding new memory to your system.
Dual-channel configurations can double the data transfer rate compared to single-channel, enhancing performance.
It’s possible, but all RAM sticks will run at the speed of the slowest stick, which may not be optimal.
Latency refers to the delay before data transfer begins. Lower latency means faster data access and better performance.
Yes, the motherboard has a maximum RAM capacity and a number of slots that limit the amount of RAM you can install.
For a detailed guide on checking your desktop PC’s RAM usage, please visit our Product page and click on the ‘How to Check Desktop RAM’ tab.
More RAM can improve system responsiveness, allow for more open applications, and enhance gaming and content creation experiences.
If your PC is slow due to insufficient RAM, adding more can speed it up. However, if the CPU or storage is the bottleneck, more RAM won’t help.
ECC (Error-Correcting Code) RAM can detect and correct data corruption, typically used in servers and workstations.
For a complete guide on installing new RAM in your desktop PC, please refer to the ‘How to Install Desktop RAM’ section located on our Product page. This resource provides you with step-by-step instructions to ensure a correct and safe installation.
Yes, sufficient RAM is crucial for smooth gaming, especially for games with large maps and high-quality textures.
VRAM (Video RAM) is dedicated to the graphics card for rendering images, while RAM serves the entire system.
Symptoms of failing RAM include frequent crashes, blue screens, and data corruption.
If the RAM is compatible with the new motherboard and meets the required specifications, you can use it.


