


- Description
- Warranty Information
- Hardware Specifications
- How to Install Desktop RAM?
- How to Check Desktop RAM?
- FAQs


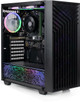
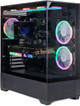
XUM Gaming PC: AMD Ryzen 5 5500 | RTX 4060 8GB | 32GB RAM | 512GB SSD | 1TB HDD
Unleash your gaming potential with the XUM Gaming PC, built to handle even the most demanding titles with ease. Powered by the AMD Ryzen 5 5500 CPU and an RTX 4060 8GB graphics card, this gaming desktop offers a flawless gaming experience at every level. Whether you're gaming at 1080p, diving into immersive 1440p gameplay, or pushing boundaries with 4K resolution, this system has you covered. Ready to take your experience further? It’s also VR-ready, ensuring you can dive into the latest virtual reality titles with smooth performance.
Key Features:
-
Powerful Performance:
-
AMD Ryzen 5 5500 (6 Cores / 12 Threads, up to 4.2 GHz Boost) provides exceptional processing power for smooth gameplay and productivity.
-
NVIDIA GeForce RTX 4060 8GB delivers immersive graphics performance, capable of handling AAA games, 4K video editing, and high-quality streaming.
-
-
Effortless Gaming Experience:
-
1080p: Expect smooth and fast performance on popular competitive titles like Fortnite, Minecraft, and Valorant at medium settings, with framerates well over 100+ FPS.
-
1440p: Perfect for mid-range gaming, running AAA games like Cyberpunk 2077 or Red Dead Redemption 2 at high settings with 60+ FPS.
-
4K Gaming: Take your visual experience to the next level, with Assassin’s Creed Valhalla and Call of Duty Warzone running at medium settings for stable frame rates.
-
-
VR-Ready:
-
Dive into VR with full compatibility and smooth performance across a range of VR titles, making your VR experiences truly immersive and lag-free.
-
-
Enhanced Memory and Storage:
-
32GB DDR4 RAM ensures seamless multitasking and fast load times, ideal for gaming, video editing, and running heavy applications.
-
The 512GB NVMe SSD offers ultra-fast boot and load times, while the 1TB HDD provides ample storage for games, media, and files.
-
-
Connectivity and Expansion:
-
Stay connected with Gigabit LAN for fast and stable online gaming, and Wi-Fi for wireless connectivity.
-
USB 3.2 and USB 2.0 ports allow for easy connection of peripherals such as gaming accessories, external drives, or VR devices.
-
-
Cooling and RGB Lighting:
-
The system is equipped with 6 RGB fans and an A40 Pro cooler to keep the system running cool during long gaming sessions.
-
ARGB Lighting adds customizable lighting effects to enhance the look and feel of your gaming setup.
-
-
Future-Proof Design:
-
Designed with future upgrades in mind, the XUM Gaming PC ensures that you'll stay ahead of the curve with its powerful components and expandability options.
-
Built for Gamers and Streamers:
This PC isn't just about playing games; it's also designed for streaming your gameplay with minimal lag. Run streaming software and games simultaneously, ensuring your audience gets the best view of your playthroughs without interruptions.
Operating System: Windows 11 ensures compatibility with the latest software and hardware, providing a sleek, user-friendly interface and the latest features for both productivity and entertainment.
Ideal for:
-
Gamers: From casual players to competitive eSports enthusiasts, this system handles all your gaming needs from casual titles to the most demanding AAA games.
-
Streamers: Stream with ease on platforms like Twitch or YouTube.
-
Content Creators: Whether you're editing videos, designing graphics, or producing music, the XUM Gaming PC ensures smooth multitasking and performance.
-
VR Enthusiasts: Ready for immersive virtual reality experiences.
Why Choose XUM?
XUM is a trusted brand in the UK, providing high-performance systems built for serious gamers and content creators. With advanced features, premium components, and responsive support, XUM delivers a top-tier gaming experience, making it your go-to choice for the ultimate gaming and computing performance.
-

- Case:
- XUM Titan
-

- Case Fans:
- 6 x RGB Fans
-

- Cooler:
- A40 Pro
-

- CPU:
- AMD Ryzen 5 5500
-

- Ethernet:
- Gigabit LAN
-

- Includes:
- ARGB Lighting; Remote Included
-

- Memory:
- 32GB DDR4 3200MHz
-

- Motherboard:
- AMD A320 / A520 / B550
-

- Operating System:
- Windows 11
-

- Power Supply:
- XUM 700W 80+ Bronze
-

- Size:
- 48H x 22W x 42L cm
-

- Storage HDD:
- 1TB
-
- Storage SSD:
- 512GB
-

- USB:
- 4x USB 3.2, 1x USB 3.0, 3x USB 2.0
-

- Video Inputs:
- HDMI, DisplayPort
-

- WiFi:
- 300 Mbps
-

- GPU:
- Nvidia GeForce RTX 4060 8GB
-

- Core:
- 6
-

- CPU Base Frequency:
- 3.6 GHz
-

- CPU Boost Frequency:
- 4.2 GHz
-

- Thread:
- 12
-

- Type:
- Gaming Desktop
-

- Warranty:
- 2 Year Parts & Labour, Life-Time Technical Support and 60 Day Refund Policy
Memory RAM Installation Guide for Desktop Computer
Step 1
Equipment required:
- Memory RAM modules
- Screwdriver (non-magnetic-tip)
- Owner’s manual
Step 2
-
Shut Down Your Computer:
Make sure to properly shut down your computer through the operating system.
-
Unplug the Power Cable:
Remove any cables connected to the computer, including the power cable.
-
Hold the Power Button:
Press and hold the power button for 5 seconds to discharge any residual electricity.
-
Open the Case:
Consult the owner’s manual for instructions on how to open your specific system’s case.

Step 3
-
Ground Yourself:
Touch an unpainted metal surface to discharge static electricity. Better yet, wear an anti-static wrist strap attached to a grounded object.
-
Locate the RAM Slots:
Open the case and locate the RAM slots on the motherboard.
-
- Remove Existing RAM (if applicable):
- Press down on the clips at the ends of the RAM slot.
- Gently remove the existing RAM module by holding the edges.

Step 4
-
Install New RAM:
- Hold the new RAM module by the edges.
- Align the notch on the module with the key in the slot.
- Firmly press the RAM into the slot until the clips snap into place. It may require about 30 pounds of pressure.
- Close the Case: Once all the RAM modules are securely installed, close the computer case.
- Reconnect Cables: Plug in the power cable and any other cables you disconnected.
-
Power On and Test:
Turn on your computer. It’s recommended to enter the BIOS to ensure the new RAM is recognized and running at the correct speed.

Post-Installation
- Check System Properties: Once your computer has booted into the operating system, check the system properties to confirm that the new RAM is detected and usable.
- Enjoy Your Upgraded Computer: You should now notice improved performance, especially when running memory-intensive applications.

Remember to handle the RAM modules carefully and avoid touching the gold connectors. Always work in a clean, static-free environment, and if you’re unsure about the process, seek professional assistance. Happy upgrading!
Happy upgrading!
How to Check Memory RAM in Your Desktop PC:
Make sure you are using a desktop computer because the RAM installation instructions are designed specifically for desktop computers.
Step 1: Identify Installed Memory
Press the Windows key + R to open the Run dialogue box.
Type "msinfo32" and press Enter. This opens the System Information window.

In the left pane, navigate to "System Summary". On the right side, you'll see details about your installed memory, including the total installed physical memory (RAM).

Using Command Prompt to Convert Memory Size to GB
Open Command Prompt by pressing the Windows key + R and typing "cmd" into the search bar.

Open Command Prompt by pressing the Windows key + R and typing "cmd" into the search bar. type the following command: "wmic memorychip get capacity" In the Command Prompt window, then Press Enter. This command will display the capacity of each memory module in kilobytes (KB).

- To convert KB to GB, divide the capacity by 1,048,576 (1024 * 1024).
- For example, if the capacity is displayed as 4294967296 KB, the calculation would be:
- 4294967296 KB / 1048576 = 4096 GB
- 4194304 KB / 1048576 = 4 GB
- Repeat this calculation for each memory module listed to determine the total memory size in GB.
Step 2: Maximum RAM Capacity
The maximum amount of RAM your computer can support is as follows:
- Press Windows Key + R, type cmd, and press Enter.
- In the command prompt, type wmic memphysical get maxcapacity, and press Enter.
- The result will be displayed in Kilobytes. Convert this to Gigabytes by dividing by (1024) twice. For example:
To calculate the maximum RAM capacity for a computer that supports up to 8GB:
- 10248388608KB=8192MB
- 10248192MB=8GB
- Thus, the maximum memory capacity is approximately 8 GB.

Step 3: RAM Slot Information Through Command Prompt.
- Press the Windows Key + R to open the Run dialog box.
- Type "cmd" and press Enter to launch Command Prompt.
- In the Command Prompt window, type: wmic Memphysical get MemoryDevices Then, press Enter.
- The number displayed represents the total number of RAM slots on your computer. For Example, if it shows '2', your computer has two slots.
To determine the maximum capacity per slot, divide the total maximum RAM by the number of slots. For example, if your system has a maximum capacity of 8 GB and 2 slots, each slot supports up to 4 GB.

Step 4: Slot Information Through Task Manager
Press Ctrl + Shift + Esc together to directly open the Task Manager.
Alternatively, press Ctrl + Alt + Delete, then select "Task Manager" from the options menu that appears.
Another alternative is to right-click on the taskbar and select "Task Manager" from the context menu.
Click on the "Performance" tab in the Task Manager window. In the left pane, click on "Memory". This will display information about your system's memory usage.
Look for the "Slots used" field under the "Memory" section. This indicates the number of memory slots currently in use.

Step 5: To identify the required generation of RAM:
- Open Task Manager with Ctrl + Shift + Esc or by right-clicking the Start button.
- Navigate to the ‘Performance’ tab to find the RAM generation (e.g. DDR3, DDR4). RAM generations are not interchangeable.
Step 6: Check Memory Speed
- In the same Memory section of the System Information window, look for the "Speed" field.
- The speed will be listed in megahertz (MHz) and indicates the frequency at which the memory operates.

Step 7: System Memory Support
Determine your system's architecture using either of the following methods:
Option 1: Using Command Prompt
- Press the Windows Key + R to open the Run dialog box.
- Type "cmd" in the command prompt window and then press Enter.
- In the Command Prompt window, type: wmic os get OSArchitecture Then, press Enter. This command will display whether your system is running a 32-bit or 64-bit version of Windows.

Option 2: Check System Memory Support.
- Press the Windows Key + R to open the Run dialog box.
- Type "msinfo30" in the Run dialog box to open the system information, then Press Enter.
- In the System Information window, look for the "System Type" under the "System Summary" section. This command will display whether your system is running a 32-bit or 64-bit version of Windows.
Based on your system's architecture, understand the following limitations:
- For 32-bit Windows: The maximum amount of RAM supported is typically around 4 GB, although this can vary depending on the specific version of Windows and any limitations imposed by hardware or software.
- For 64-bit Windows: The maximum amount of RAM supported varies depending on the specific edition of Windows. For example, Windows 10 Home supports a maximum of 128 GB of RAM, while Windows 10 Pro and Enterprise support up to 2 TB of RAM.

Gaming PCs FAQs
XUM gaming PCs are built with the latest technology and high-quality components to deliver exceptional performance and reliability for gamers.
All XUM gaming PCs come with a 2-year warranty that covers hardware defects and technical issues. Extended warranties are also available.
XUM gaming PCs are capable of running a wide range of games, from the latest AAA titles to classic indie games, at high settings. Please scroll down to find the list of compatible games on this page.
Your XUM gaming PC will come with a PDF setup guide. Additionally, Drmem provides online support to help you get started quickly and easily.
Yes, select models of XUM gaming PCs are VR-ready and fully equipped to handle virtual reality gaming.
Drmem provides comprehensive support for XUM users, including technical assistance, troubleshooting, and repair services.
The need to upgrade your XUM gaming PC depends on your gaming requirements and the evolving technology. Drmem’s team can advise you on the optimal upgrade path.
You can install any compatible software on your PC to enhance your gaming experience.
Yes, XUM PCs support multi-monitor setups, allowing you to expand your gaming and multitasking capabilities.
XUM gaming PCs are capable of running a wide range of games, from the latest AAA titles to classic indie games, at high settings. Please scroll down to find the list of compatible games on this page.
XUM PCs are designed with energy efficiency in mind, utilizing the latest power-saving technologies to reduce electricity consumption.
XUM PCs are available for purchase on Drmem’s official website, as well as through marketplaces like Amazon, eBay, Costco, etc.
Drmem accepts various payment methods, including credit/debit cards, PayPal, and Klarna financing options.
Drmem conducts rigorous testing and quality control checks on all XUM gaming PCs to ensure they meet the highest standards before shipping.
